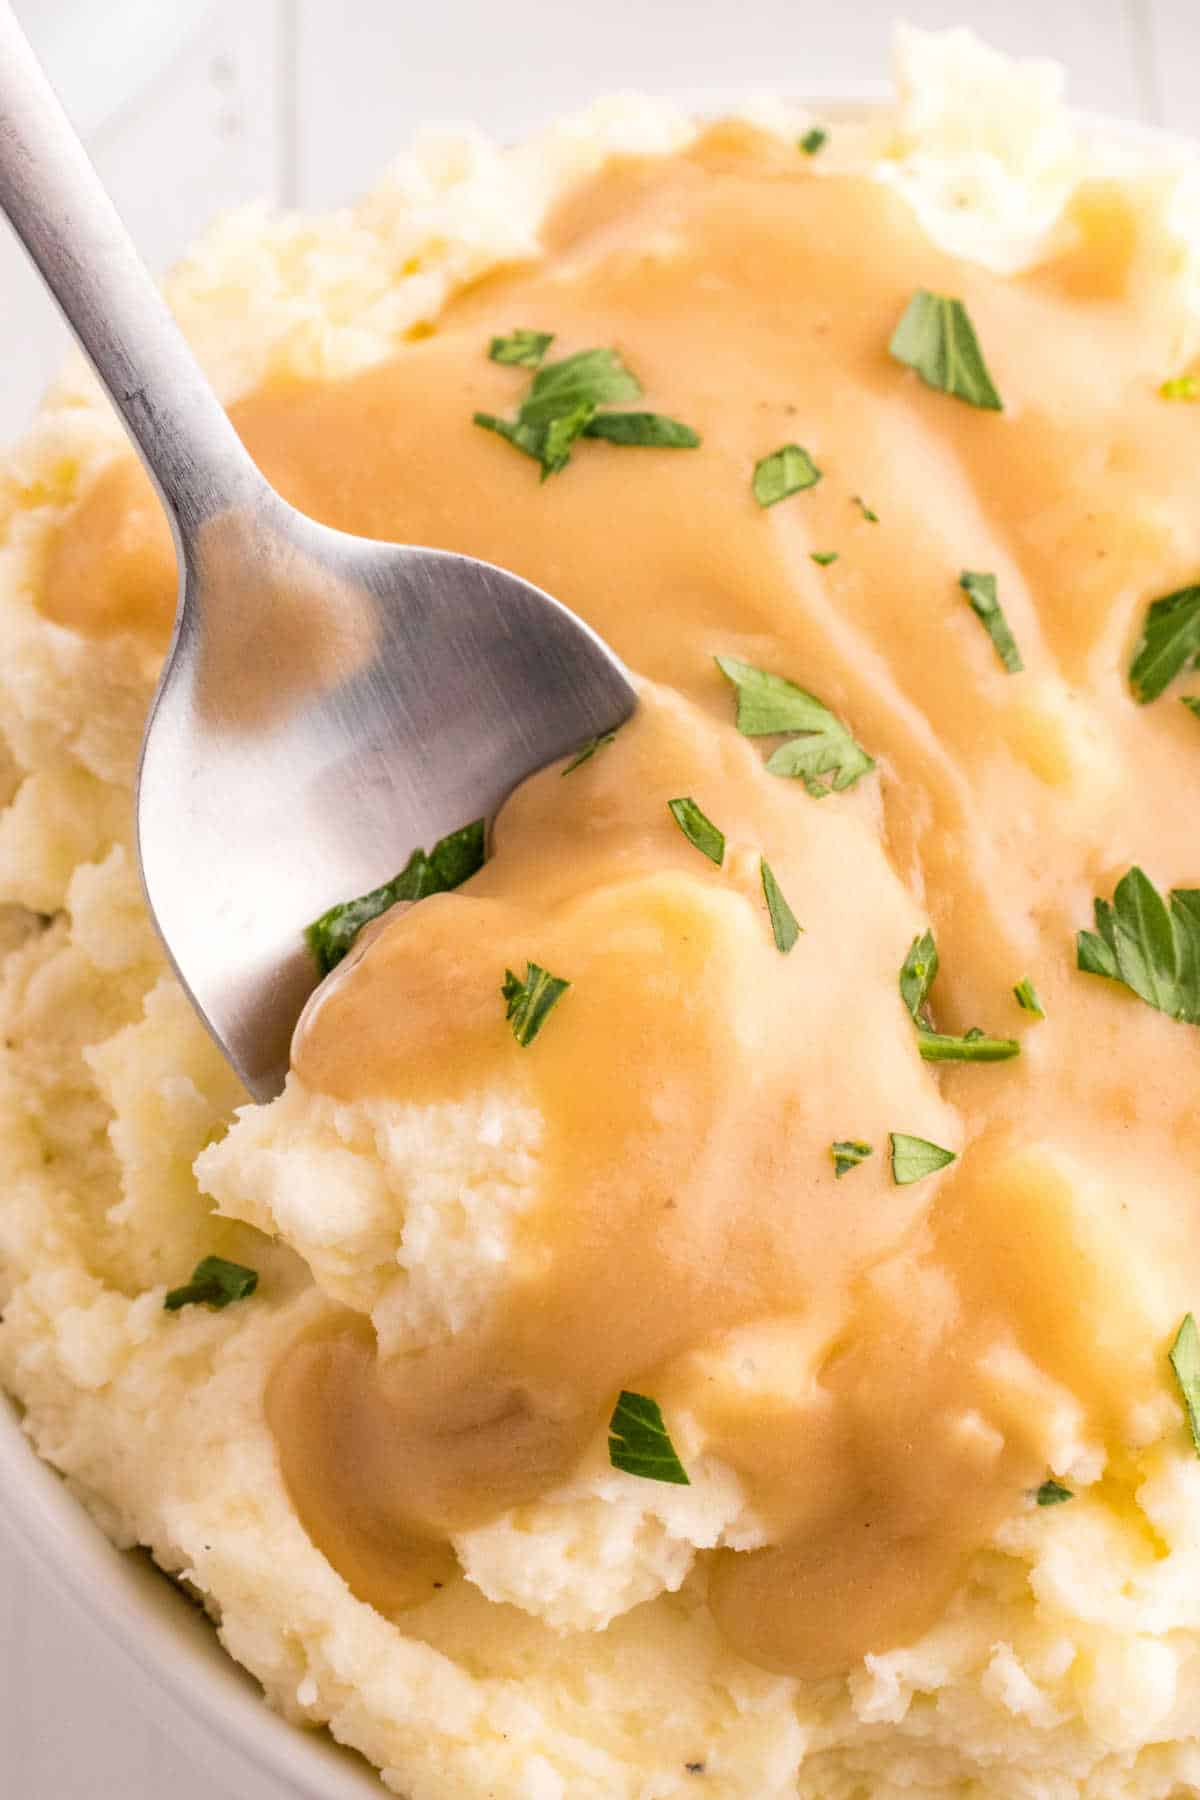
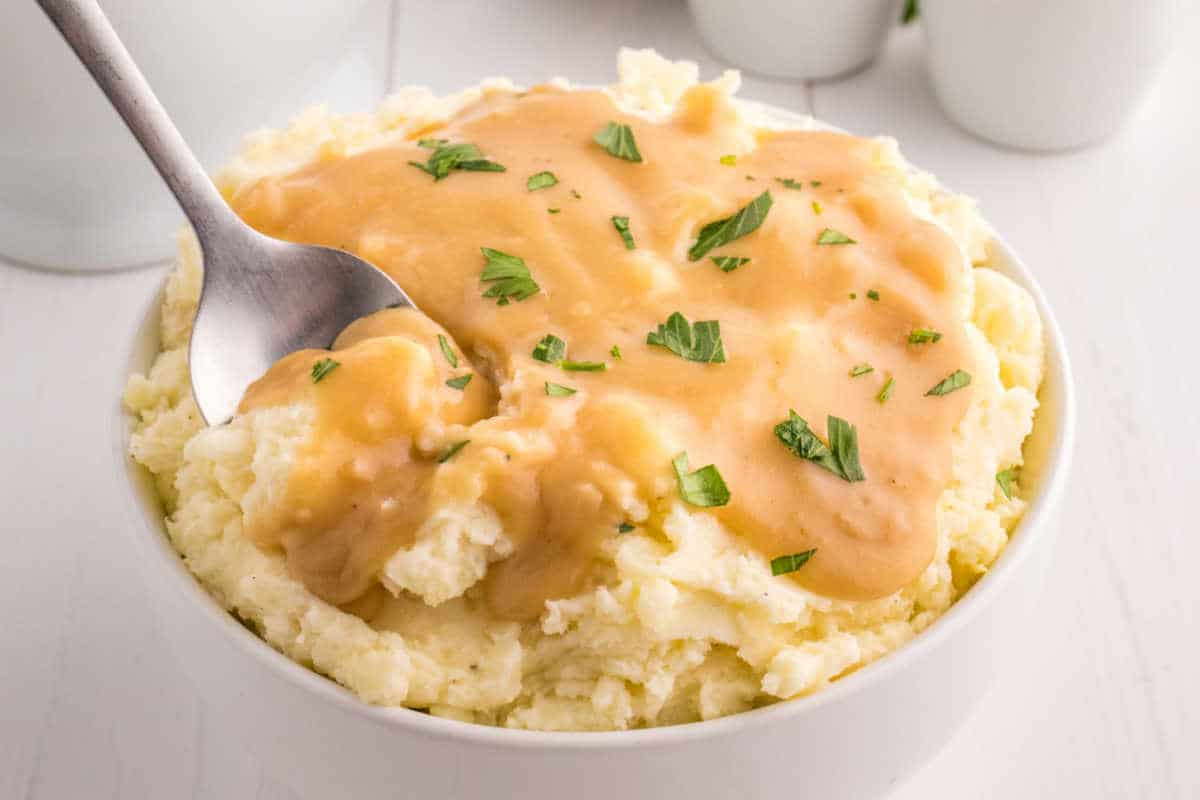
Brown Gravy

Whipping up a homemade brown gravy without any pan drippings is easier than you think, and it’s a classic topping for potatoes, noodles, and sandwiches. This smooth and delectable sauce is made from scratch and adds that perfect touch to your meals.
This homemade brown gravy is your kitchen’s secret weapon, and there’s no need for meat drippings. It’s elevated with the aromatic goodness of fresh garlic and onions, plus the herbal finesse of fresh thyme and parsley. The delightful kick of Worcestershire sauce adds a punch of delicious flavor. This savory sauce can jazz up any dish, from roast turkey to creamy mashed potatoes and roasted veggies, making your holiday feasts taste even more fantastic.
The best part? This gravy isn’t just for the holidays! It makes a great sidekick for everyday meals. It adds a fantastic element to any dish, turning the most simple recipe into a rich flavor explosion. Once you try this recipe, you will want to make it all the time.
Why You’ll Love Brown Gravy
- Easy to Make: Making brown gravy is a straightforward process. You can whip up this easy brown gravy recipe with only a few simple ingredients and a little time.
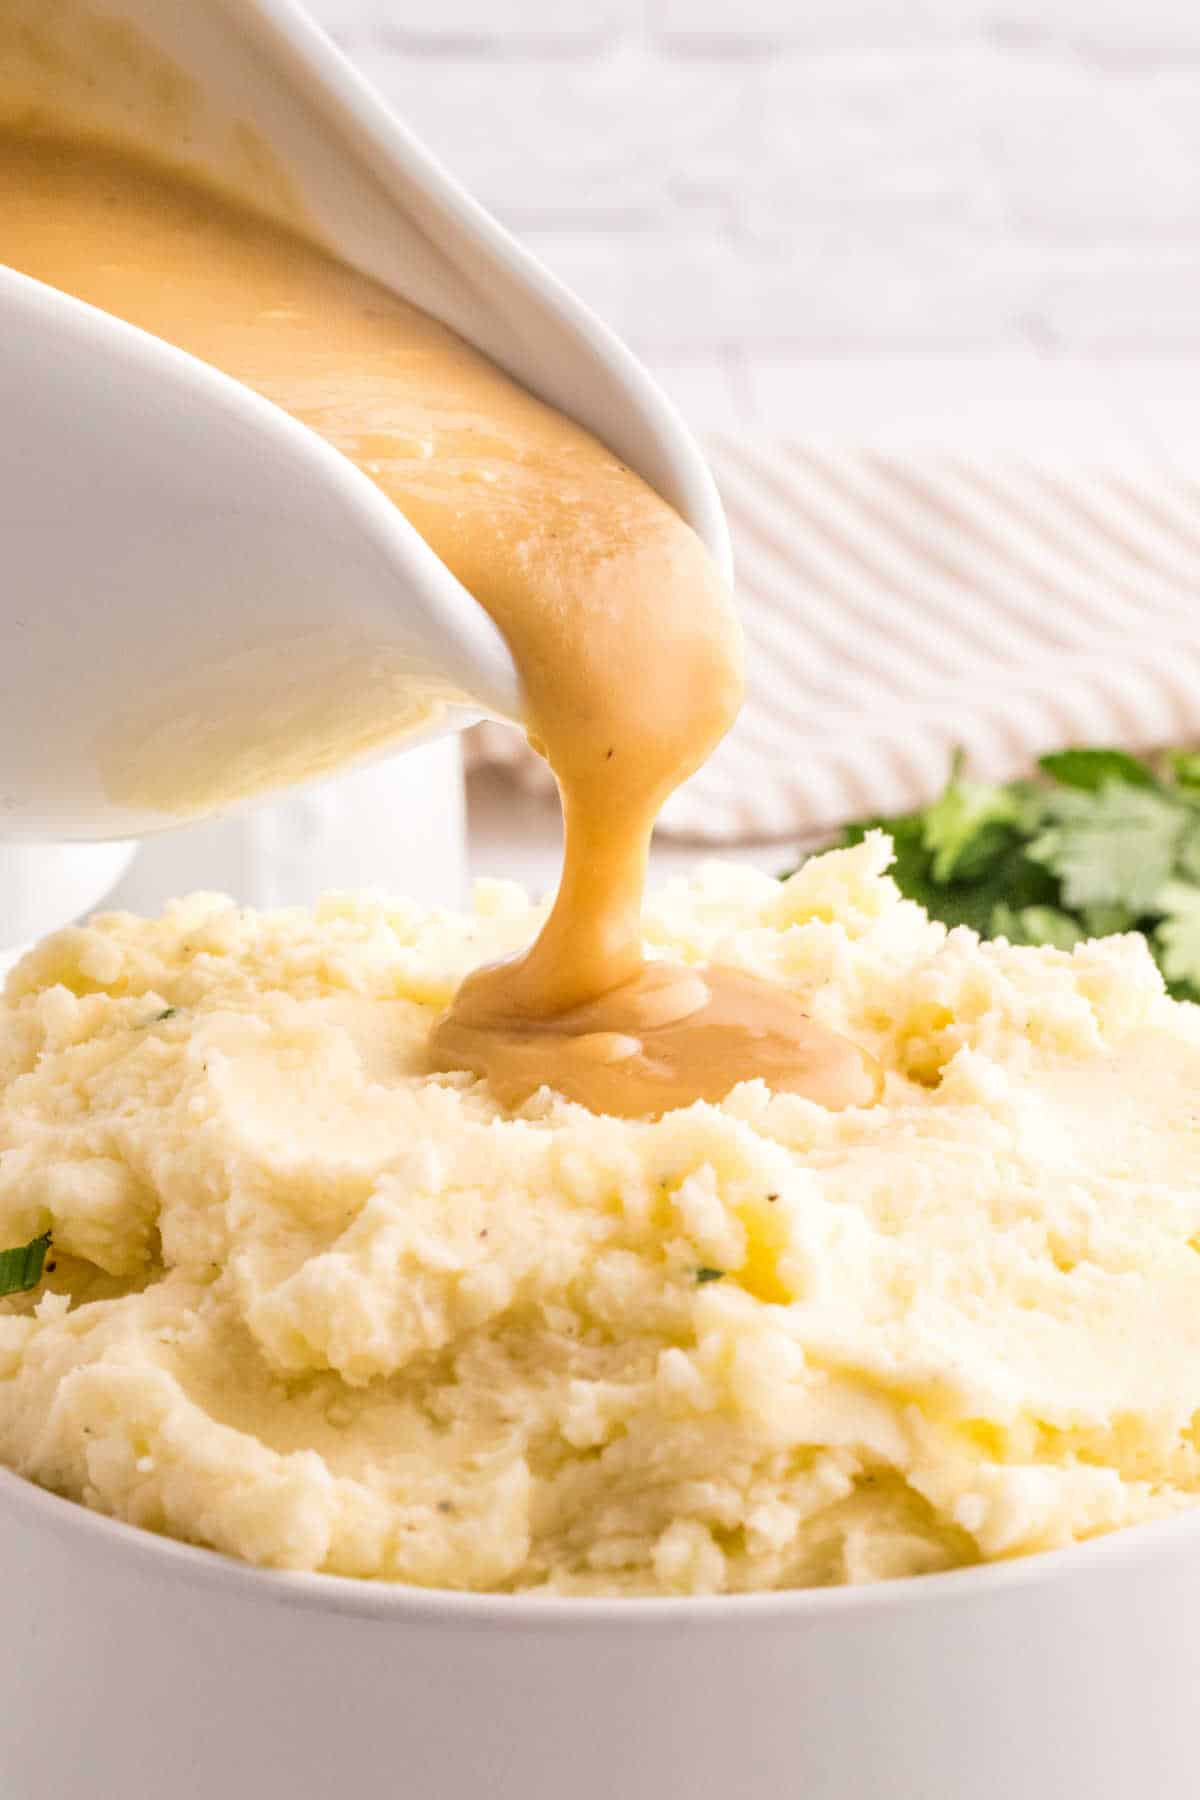
- Versatility: Brown gravy is incredibly versatile and can enhance a wide range of dishes. Whether poured over roast meats, mashed potatoes, or used as a dip for bread and vegetables, it adds flavor and richness to numerous meals.
- Comfort Food: Brown gravy is the epitome of comfort food. Its warm, savory flavors are incredibly comforting, making it a popular choice for home-cooked meals. It makes the perfect topping for many dishes, providing extra flavor to your favorite dishes.
- Flavor Enhancement: Brown gravy elevates the flavor of other dishes. It can rescue a dry piece of meat, turn plain vegetables into a tasty side, and make mashed potatoes exceptionally delicious.
- Crowd Pleaser: Brown gravy is universally enjoyed, making it a crowd-pleaser. It’s a safe bet for gatherings and potlucks, as it will satisfy everyone gathered around your table.
Ingredients
The full printable recipe card with measurements and instructions is found at the bottom of the post.
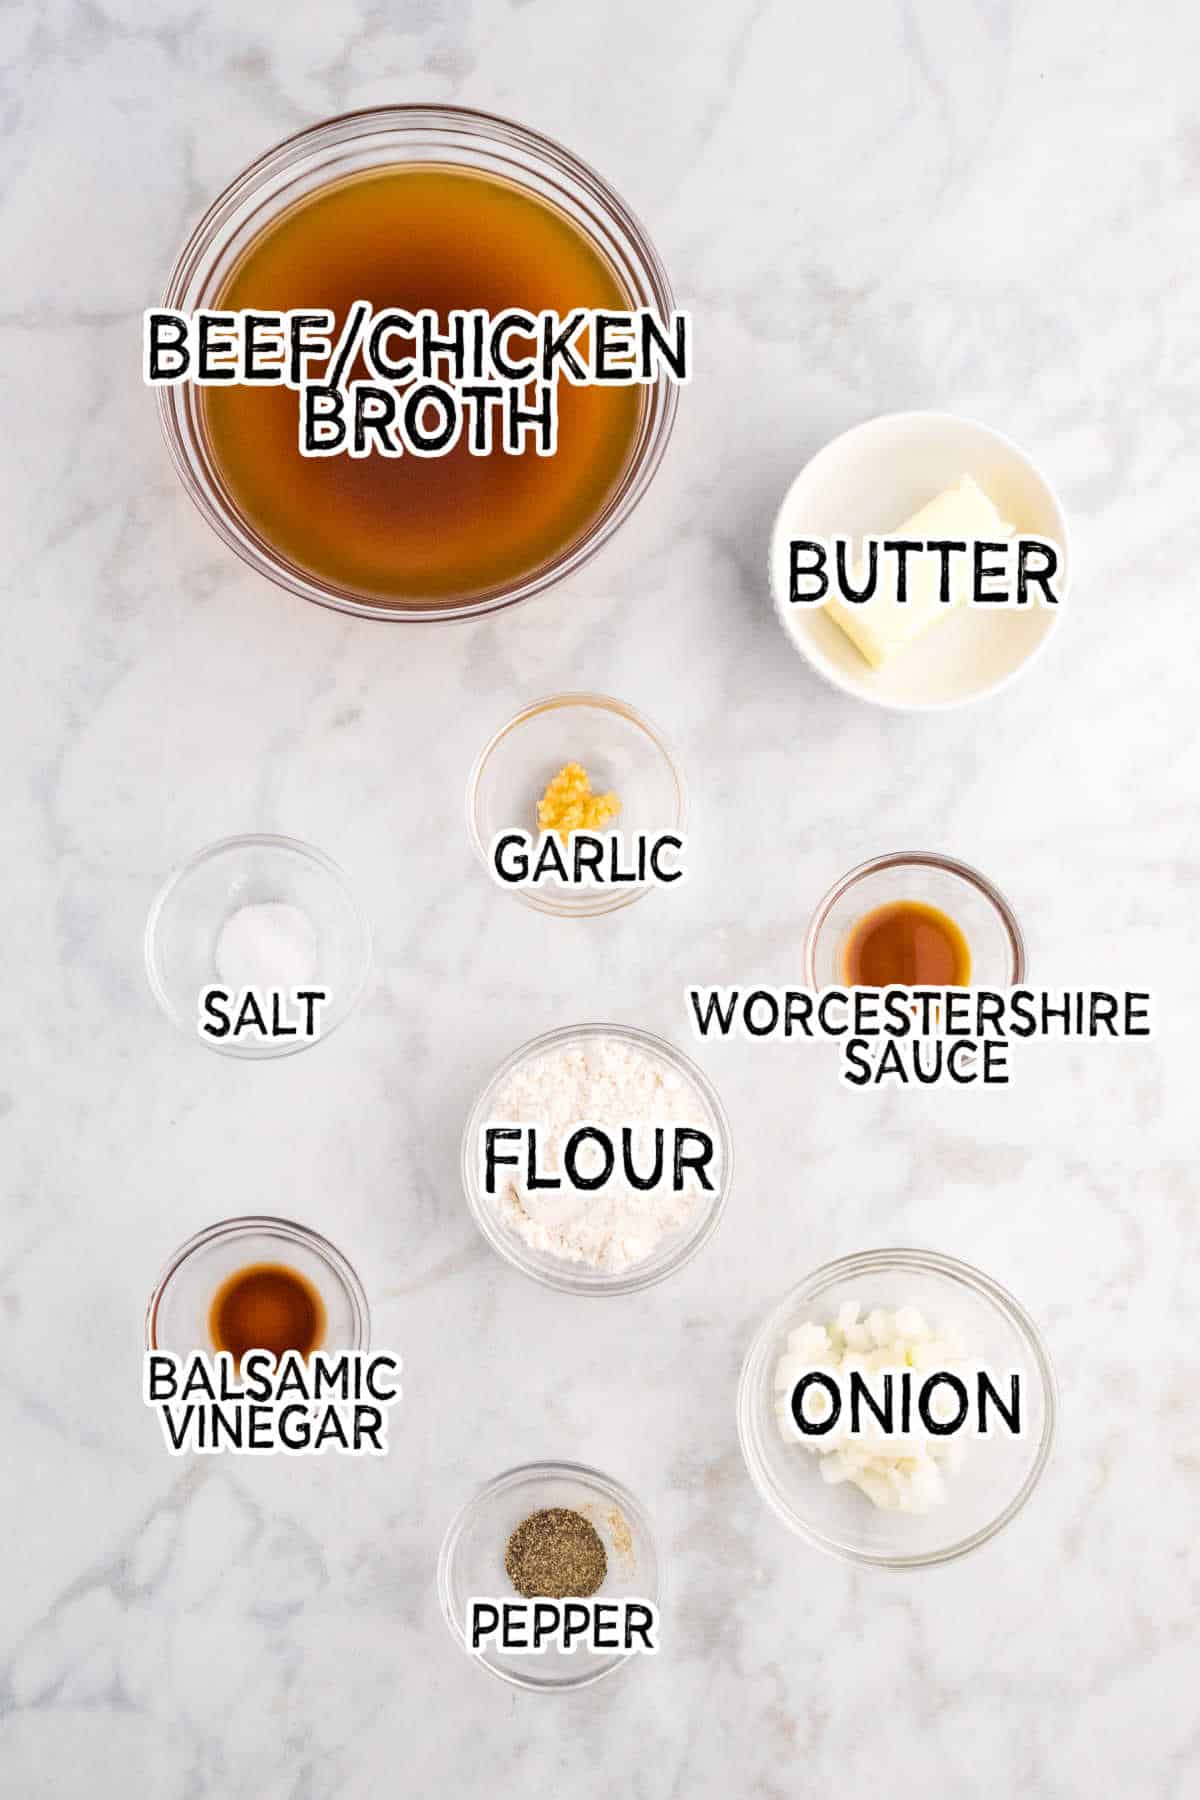
- Butter
- All-purpose flour
- Onion
- Low-sodium beef stock or chicken broth
- Balsamic vinegar
- Worcestershire sauce
- Salt and black pepper
- Fresh thyme or parsley
How to Make Brown Gravy
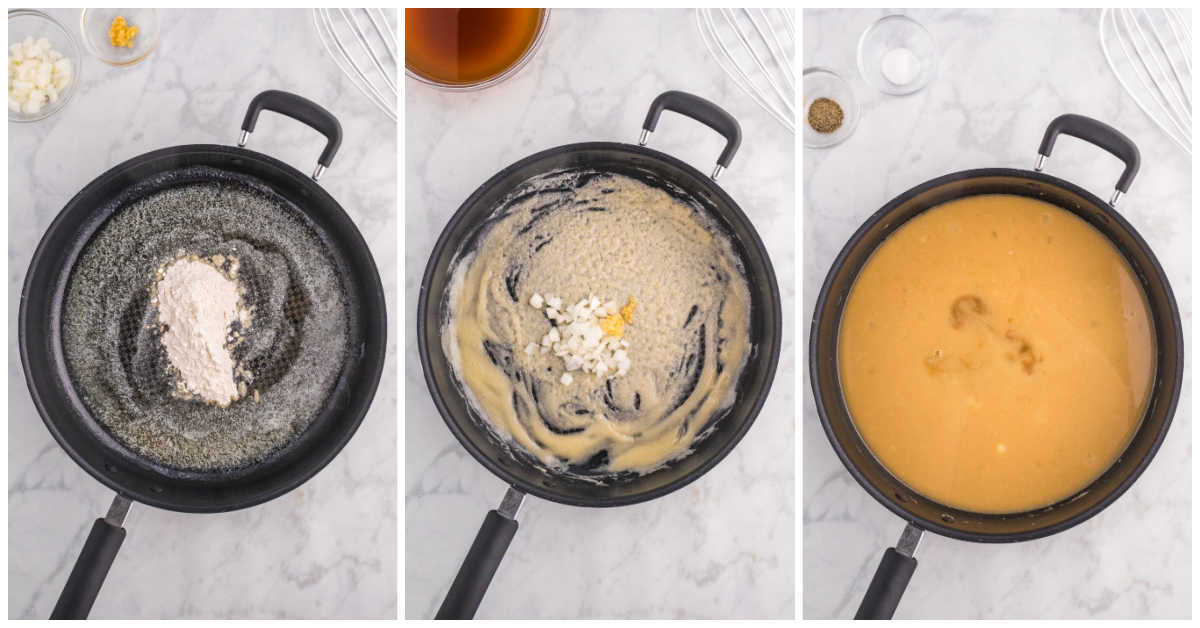
- Step One: Melt the butter over medium heat in a medium saucepan. Add the flour and whisk constantly to form a smooth roux. Cook for about 2-3 minutes until the roux is light golden.
- Step Two: Reduce heat to medium-low. Stir in the chopped onion and garlic. Cook for 2-3 minutes until the onions are translucent and aromatic.
- Step Three: Slowly pour the beef or chicken broth while whisking continuously to avoid lumps. The roux will thicken as you whisk.
- Step Four: Mix the balsamic vinegar and Worcestershire sauce until well combined. Taste and add more if you’d like a more robust flavor.
- Step Five: Season the gravy with salt and pepper to taste.
- Step Six: Reduce the heat to low and let the gravy simmer gently for 10-15 minutes. This helps the flavors develop and the gravy to thicken.
- Step Seven: If you prefer a smoother gravy, you can strain it through a fine mesh strainer to remove any onion or garlic bits. This step is optional and depends on your preference.
- Step Eight: Just before serving, garnish the gravy with fresh thyme or parsley for a pop of color and added flavor.
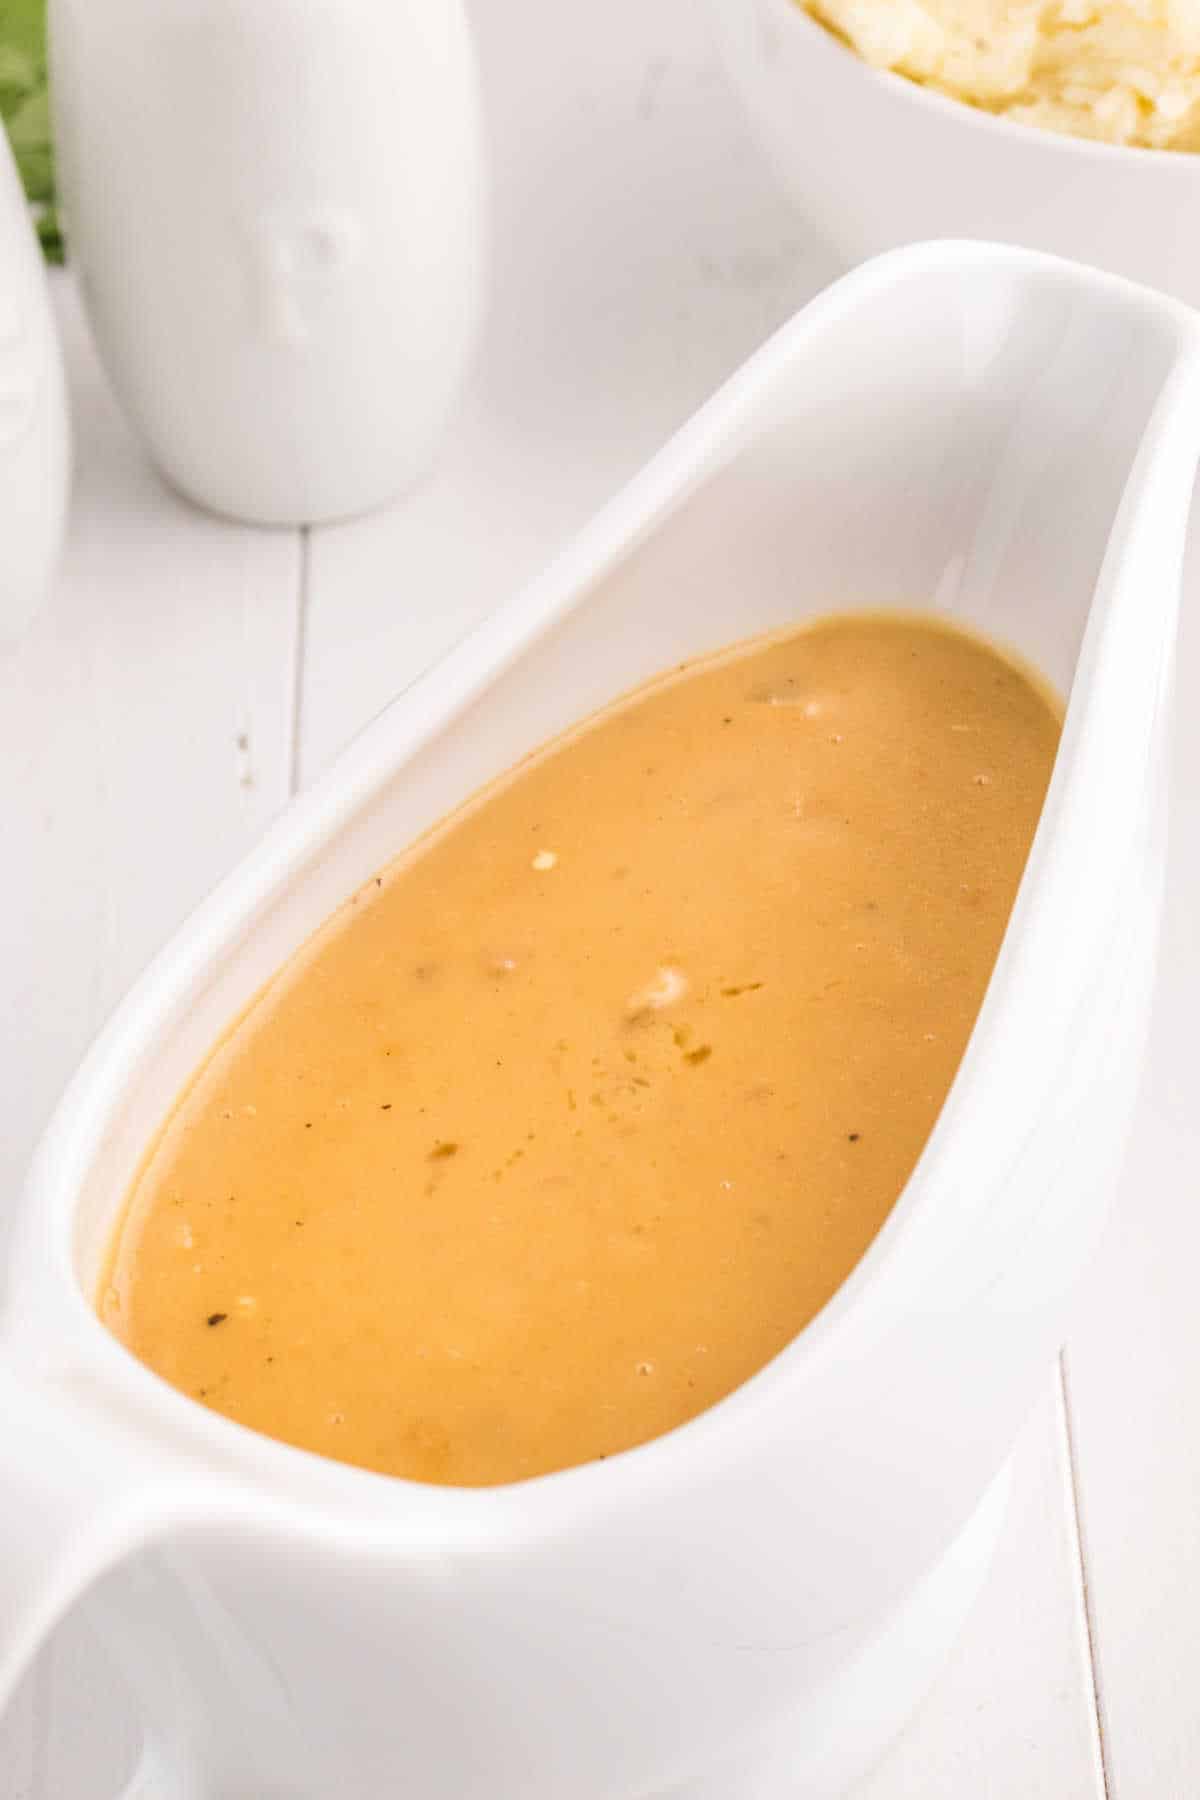
- Step Nine: Transfer the homestyle brown gravy to a gravy boat or serving dish and serve.
Equipment Needed
This post contains affiliate links.
What to Serve with Brown Gravy
There are several things that you can serve with Brown Gravy! No matter what you choose, this homemade gravy will elevate many of your favorite dishes.
- French Fries
- Slow Cooker Rosemary Garlic Mashed Potatoes
- Pork Chops
- Meatloaf
- Turkey
- Olive Oil Mashed Potatoes with Kale and Herbs
- Roast Beef
- Pot Roast
- Fried Chicken
Variations and Substitutions
- Mushroom Gravy: Add sautéed mushrooms for a rich and earthy flavor. Cook sliced mushrooms in a separate pan until they release moisture and turn golden brown, then stir them into the gravy.
- Red Wine Gravy: Substitute some of the broth with red wine for a more sophisticated twist. This will add a deep complexity to the gravy.
- Herb-Infused Gravy: Experiment with different herbs to change the flavor profile. Fresh rosemary, sage, or tarragon can add unique and aromatic notes to your gravy. Consider adding fresh herbs of your choice to add a delicious twist to the brown gravy.
- Spicy Gravy: If you like a little heat, add a pinch of cayenne pepper, red pepper flakes, or hot sauce to spice up your gravy.
- Citrus Zest: For a citrusy twist, consider adding a hint of lemon or orange zest. It provides a fresh and zesty flavor that pairs well with poultry.
- Onion Varieties: Use different types of onions for unique flavors. Shallots or red onions, for example, can provide a slightly sweeter or more complex taste.
- Stock Options: Feel free to experiment with various types of broth, such as vegetable, mushroom, or even turkey stock, to change the gravy’s base flavor. Just make sure to stick with the low-sodium options so you can control the salt content.
- Creamy Gravy: To make a creamy version of this easy gravy recipe, stir in a bit of heavy cream or milk. This will give your gravy a luscious, velvety texture.
Storage Instructions
If you have leftovers of this delicious brown gravy recipe, you can store it for later. Just make sure that you allow the gravy to cool. Then, transfer it to an airtight container and store it in the fridge for 2-3 days.
Can I Freeze?
Steer clear of freezing brown gravy, which can mess with its texture and flavor. Freezing might make the gravy split into components and even change its taste. When you thaw it, you could end up with gravy that doesn’t feel right and has lost some richness. It’s better to whip up fresh gravy when you need it or keep leftovers in the fridge for a few days. It’ll stay tastier that way!
Recipe Tips and Tricks
- Perfect Roux: Creating a smooth roux is crucial for the gravy’s texture. Ensure you cook the flour and butter mixture until it is golden. This helps eliminate any raw flour taste.
- Onion and Garlic: If you prefer a milder flavor, sauté the onions and garlic for a shorter time. For a more robust flavor, cook them longer until they caramelize slightly.
- Gradual Broth Addition: Pour the broth slowly and steadily into the roux while whisking continuously. Adding the broth slowly helps prevent lumps and results in a smoother texture.
- Adjusting Thickness: Add more broth to reach your desired consistency if your gravy is too thick. Conversely, if it’s too thin, let it simmer a bit longer to thicken naturally. You can easily adjust the thickness of your gravy to your tastes.
- Fresh Herbs: Fresh thyme and parsley can be added at the end for freshness and flavor. Remember, a little goes a long way, so use them sparingly.
- Straining: Straining the gravy is a personal choice. Use a fine mesh strainer if you prefer a smoother texture without onion or garlic bits. This will keep all the flavor without the chunks.

What is Brown Gravy?
Brown gravy is a rich, savory sauce made from butter, flour, broth, and seasonings. It’s a versatile and comforting sauce that enhances dishes like roast meats and mashed potatoes, making them even more delicious. The best part? You don’t need any beef drippings to make it.
How to Prevent Lumps in Gravy
- Smooth Roux: Start by making a smooth roux. Melt the fat (usually butter) and add the flour. Whisk continuously to create a smooth paste. Cooking this mixture until it’s a light golden color will help eliminate the raw flour taste.
- Gradual Broth Addition: Do it gradually and whisk continuously when adding the broth. Slowly pour the liquid into the roux while whisking, which helps to incorporate it smoothly and prevents lumps.
- Consistent Whisking: Keep that whisk moving! Stirring or whisking constantly ensures that the roux and liquid blend evenly, minimizing the chances of lumps.
- Strainer (if needed): If lumps do appear, and you prefer a super-smooth gravy, you can strain it. Pour your gravy through a fine mesh strainer before serving to remove any remaining lumps and avoid lumpy gravy.
How to Reheat
When warming up leftover gravy, place it in a small saucepan over low heat on your stovetop. If it’s too thick, add a little water or broth to thin it out. Stir occasionally until it’s heated through.
Roux vs. Slurry
Roux is a mixture of fat and flour cooked together, while a slurry combines a liquid (like water or broth) with a starch. Roux adds flavor and a consistent thickness, often used in French sauces, gravies, and soups. The cornstarch slurry is quick to prepare, has a clear consistency, and is excellent for dishes with a glossy, clear thickening, like some Asian dishes or fruit pie fillings. Their choice depends on the desired texture, flavor, and recipe.
How to Make Gravy with Drippings
To make delicious gravy with drippings, pour off the excess fat from the roasting pan, leaving the flavorful drippings. Heat the pan on the stovetop, add flour, and whisk to create a roux. Gradually incorporate broth, stirring constantly, until the gravy thickens. Season to taste, and you’ve got delicious homemade gravy from the pan drippings!
How to Thicken Gravy
To thicken gravy, mix a small amount of flour or cornstarch with water or broth to create a smooth paste. Gradually whisk this paste into the simmering gravy and cook until it reaches your desired thickness.
FAQ
This is the best brown gravy recipe because it doesn’t take long to make. The prep time is only about 10 minutes, and the cook time is 25 minutes. In only 35 minutes, you will enjoy the best gravy without much effort.
This recipe makes 6-8 servings of brown gravy. It can easily be doubled or halved to suit your needs.
Recipes with Gravy
- Country Gravy
- Poutine
- Crockpot Pickle Chicken
- Mushroom Swiss Steak
- Slow Cooker Beef and Noodles
- Sausage Gravy
Try these Sour Cream Biscuits.
Follow me on Instagram @simplystacieblog, Facebook at Simply Stacie, TikTok @simplystacierecipes or Pinterest at @simplystacie and let me know how you liked this recipe and my other recipes.

Brown Gravy
SAVE THIS RECIPE!
Ingredients
- ¼ cup salted butter
- ¼ cup all-purpose flour
- ¼ cup yellow onion finely chopped
- 2 cloves garlic minced
- 2 cups beef or chicken broth low sodium
- 1 tsp balsamic vinegar
- 1 tsp Worcestershire sauce
- salt and pepper to taste
- Fresh thyme or parsley finely chopped, for garnish, optional
Instructions
- In a medium saucepan, melt the butter over medium heat. Add the flour and whisk constantly to form a smooth roux. Cook for about 2 to 3 minutes until the roux is a light golden color.
- Reduce the heat to medium-low. Stir in the chopped onion and garlic. Cook for an additional 2 to 3 minutes or until the onions are translucent.
- Slowly pour in the beef or chicken broth while whisking continuously to avoid lumps. The mixture will thicken as you whisk.
- Add the balsamic vinegar and Worcestershire sauce, mix until well combined. Taste and add more if you'd like a stronger flavor.
- Season the gravy with salt and pepper to taste.
- Reduce the heat to low and let the gravy simmer gently for about 10 to 15 minutes.
- If you prefer a smoother gravy, you can strain it thorugh a fine mesh strainer to remove any onions or garlic bits. This step is optional.
- Before serving, garnish with fresh thyme or parsley, if desired. Transfer the gravy to a serving dish or gravy boat.
Notes
Nutrition
The information shown is an estimate provided by an online nutrition calculator. It should not be considered a substitute for a professional nutritionist’s advice.
Did you make this recipe?
I’d love to see it! Make sure to share it on your favorite social platform.
Want Even More Recipes?
Join Moms Best Recipes to find more delicious family recipes.
free ebook!
The Best of Simply Stacie
When you subscribe to the newsletter for the latest updates!